Manage User Data
User Profile Overview
Every user in IFS Cloud has a personal profile containing their personal information. Depending on your organization's policies, the system administrator might ask you to update your profile when you first log in. To update your details, follow the steps below.
Edit Information
 |
|
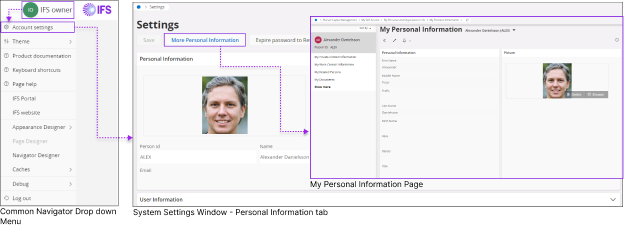
Once you log into IFS Cloud Web:
- Click the Common Navigator drop down menu to accessSystem Settings.
- In the Settings window, you can view your personal information in “Personal Information” tab.
- If you wish to modify your personal information click on More Personal Information button to access My Personal Information page.
|
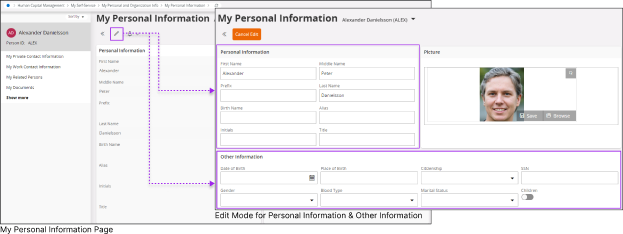
My Personal Information
You can edit all your personal information using My Personal Information page.
 |
|
Once you go to My Personal Information page:
| Edit |
 |
|
Click on the Edit button to access the edit mode of Personal Information section and Other Information section. |
| Cancel Edit |
 |
|
If you wish to stop editing the information, click the Cancel Edit button. This will remove any new information you've added and take you out of the editing process. |
|
Note:
The Personal Information section and Other Information Section may have different data fields based on your organization's specific requirements.
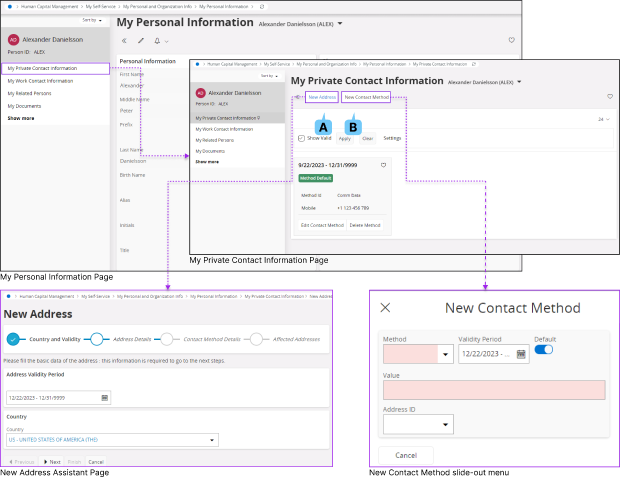
New Private Contact Information
Once you go to My Personal Information page, click on the My Private Contact Information title on the Record Selector Panel to access My Private Contact Information page.
 |
|
| A : New Address |
 |
|
- Click on New Address button in My Private Contact Information page to add a new address to your profile.
- Use the instructions provided on the IFS Cloud New Address Assistant page to add new address details.
|
| B : New Contact Method |
 |
|
- Click the New Contact Method button in My Private Contact Information page to add a new contact method to your profile.
- When you're on the New Contact Method slide-out menu, complete the form to add a new work contact to your profile.
|
|
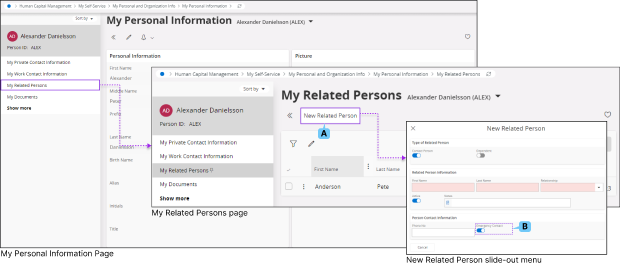
New Related Person / Emergency Contact
Once you go to My Personal Information page click on the My Related Persons title on the Record Selector Panel
to access my My Related Persons page.
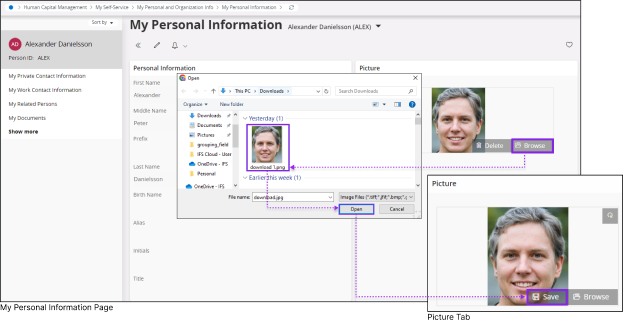
Editing Picture
Once you are in the My Personal Information page go to Picture section to edit your profile picture.
 |
|
| Delete a Picture |
 |
|
Click the Delete button to delete your existing picture.
|
| Browse for a Picture |
 |
|
Click on the Browse button to browse for a new picture from your local repository
- Select a new picture from your local repository as shown in the diagram
- Click Open button to add the picture to your IFS Cloud enviroment
|
| Save a Picture |
 |
|
Click the Save button to save your selected picture in IFS Cloud
|
| Rotate a Picture |
 |
|
If you wish to rotate your uploaded picture, use the rotate button located at the top right corner of the profile picture window
|
|
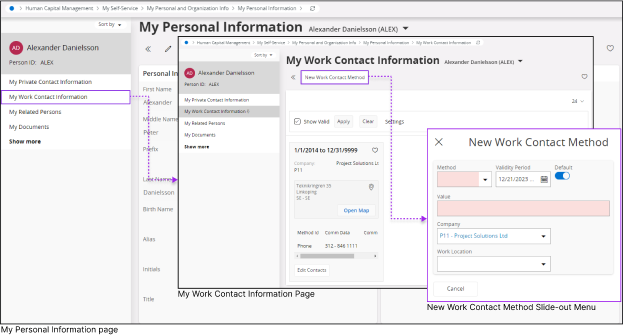
New Work Contact Information
Once you go to My Personal Information page click on the My Work Contact Information title on the Record Selector Panel.
 |
|
| New Work Contact Method |
 |
|
- Click the New Work Contact Method button in My Work Contact Information page to add a new work contact to your profile.
- Once you add a place holder for the document you will be able to see it among the list of other document place holders. In order to add a new document inside the place holder
|
|
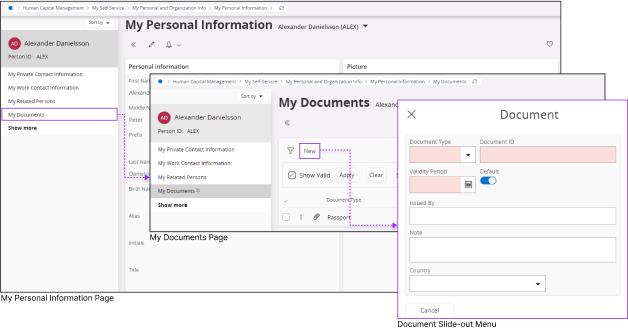
Adding your Personal Documents
Once you go to My Personal Information page click on the My Documents title on the Record Selector Panel to access My Documents Page.
 |
|
| Uploading New Document |
 |
|
- Click the New button in My Documents page to add a placeholder for your new document upload
- Once you add a place holder for the document you will be able to see it among the list of other document place holders. In order to add a new document inside the place holder
|
|
 |
|
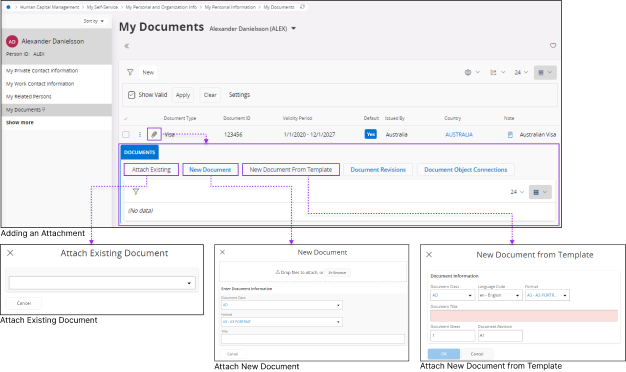
| Adding an Attachment |
 |
|
- Click the Attach button to access the attach options
- Upon clicking the Attachment button, you'll see all the available attachment options for the placeholder you created. Choose your desired option by clicking the button in the newly opened Documents tab.
- Follow the instructions in each slide-out menu that corresponds to the option you selected to attach your document, based on your desired category.
|
|
 |
|
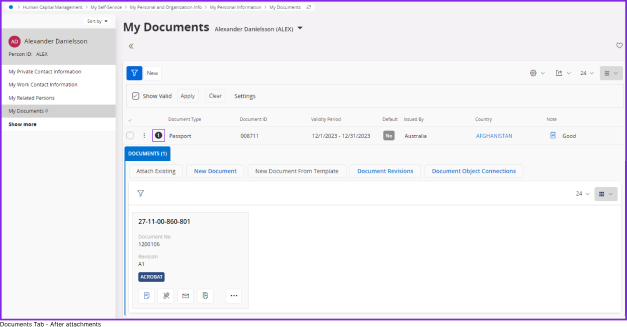
| System Behaviour After the Successful Addition of an Attachment |
 |
|
- Once you successfully attach a document to the document placeholder, attachment icon will be changed into a numeric value to show the number of attachments under that place holder.
- You can access the documents tab to view your attachment by clicking this numeric icon.
|
|
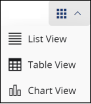
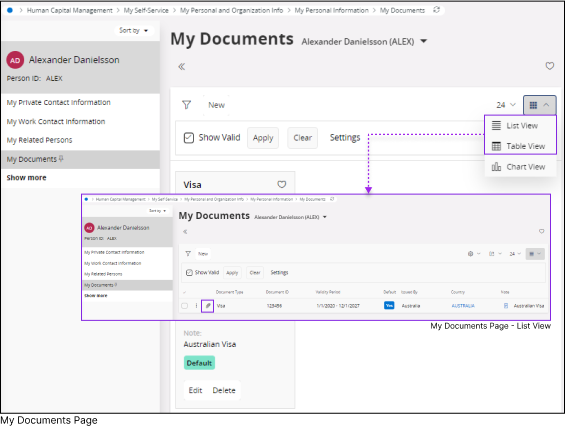
Note:
If you're using the Card View format, switch to either the List or Table View format to be able to attach files. The Card View format doesn't allow file attachments.
 |
|
When you switch to either the List View or Table View, you'll see the Attachment button in the designated placeholder row you created.
|