Tasks
|
Tasks in IFS Cloud serve as reminders for yourself or your colleagues regarding various actions to be taken. You can create tasks manually through
Event Actions or have them generated by an external workflow engine. To understand more about Event Actions, refer to the Technical Documentation.
A task can be created to notify about one or multiple actions within IFS Cloud Web. To see the actions that need attention, click on the task tile or explore additional actions.
|
 |
|
How to Access My Tasks Page
In order to view your tasks use the following steps:
 |
|
Click the Notifications icon on the navigation bar. |
 |
|
Click the Three dot menu. |
And Click the Tasks tile to access My Tasks page
Or
- Open the Navigator Menu.
- Type Tasks in the Find Page section.
- Click on My Administration, My Tasks tile.
|
|
Please Note: In IFS Cloud, only the task assignee can edit a task. Once you create a task and assign it to another user, the user who initially created the task will no longer be able to edit it.
|
Properties of a Task Tile
|
|
Upon entering the My Tasks Page, you can switch the view of the My Tasks list to Card View through the View
Mode option. For detailed instructions on altering table views, refer to the Working With Tables: Card View section.
|
 |
 |
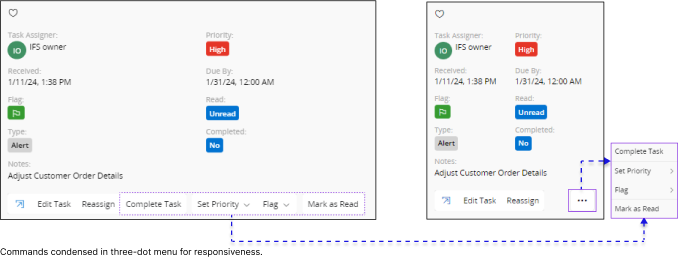
In Card View mode, you can effortlessly access all the options linked with a task.
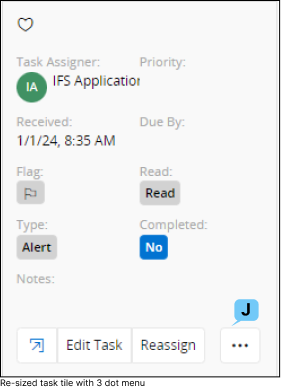
The size of the Task Tile may vary based on your screen size, and any additional options displayed in the
Task Tile will be consolidated into a three-dot button if it cannot be shown.
|
|
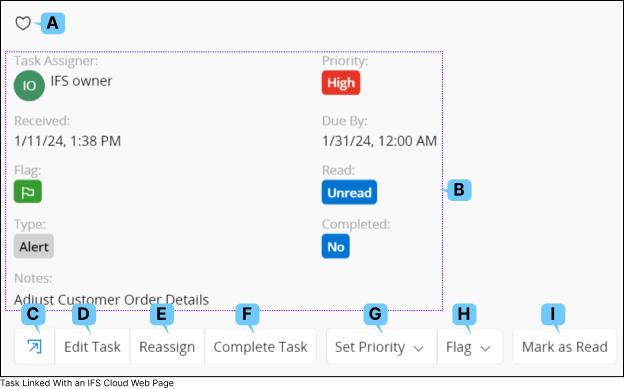
A. Favorites |
 |
|
Add the Task to your favorites list. |
|
Task Details |
This section shows all the details associated with the task such as: |
B. |
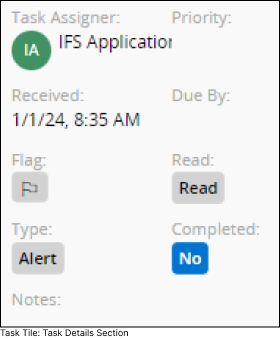 |
- Task Assigner: Person who assigned the Task.
- Priority: Priority level of the task.
- Received: Date you received the task.
- Due By: Task due date.
- Flag: Assigned flag for the task.
- Read: Marked as Read / Unread.
- Type: Type of the task (Types are defined by the admin).
- Notes: Information related to task.
|
|
|
C. Navigate to Page |
 |
|
When you create a task from an IFS Cloud Web Page, you'll notice an icon on the task tile. Clicking this icon will take you directly to the page where you created the task. |
|
Edit Task
|
 |
|
Clicking the Edit Task button will open up the Task slide out menu for you to edit the task. |
|
D. |
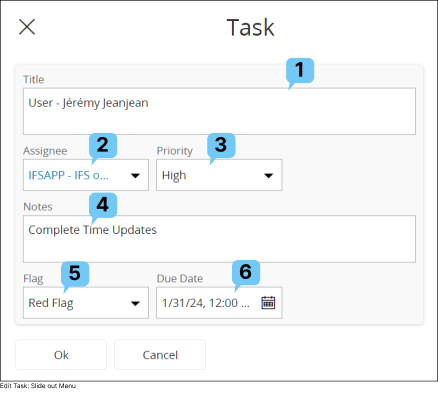 |
- Modify the Title (1) of the task by adding content for this field.
- Change the task Assignee (2) by selecting an assignee user name from the drop down menu.
- Assign a priority level for the task by selecting a priority level from the Priority (3) drop down menu.
- Add a note for the task by adding content in the Notes (4) section.
- Modify the assigned task flag by selecting a flag type from the Flag (5) drop down menu.
- Modify the task Due Date (6) and time by selecting a date and time from date picker time picker.
|
|
|
Reassign Task
|
 |
|
Clicking the Reassign button will open up the Reassign slide out menu for you to reassign the task to another user. |
|
E. |
|
|
- Change the task assignee by selecting an assignee from the Assignee (1) drop down menu.
- Modify the title of the task by adding a new title in the Title (2) section.
- Modify the priority level of the task by selecting a priority level from the Priority (3) drop down menu.
- Modify the task note by adding content in the Notes (4) section.
Note: Once you reassign a task, it will be removed from your my task list and appear on sent task list.
|
|
|
F. Complete Task |
 |
|
Click this button to mark the task as completed
|
|
Set Priority
|
 |
|
Modify the priority level of the task by selecting an option from the Priority drop down menu. |
|
G. |
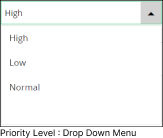 |
There are four priority levels to select from:
|
|
|
Flag
|
 |
|
Modify the assigned task flag by selecting a flag type from the Flag drop down menu. |
|
H. |
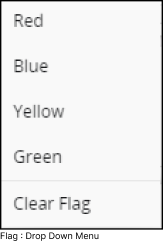 |
There are five types of flags to select from:
- Red
- Blue
- Yellow
- Green
- Clear Flag - Remove the assigned flag
|
|
|
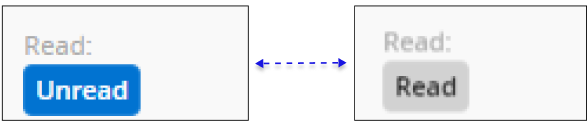
Mark As Read
|
 |
|
Use this option to mark the task that is assigned to you as Read. |
|
I. |
|
|
3 Dot Menu
|
|
|
|
When you access IFS Cloud from various devices with different screen sizes or resize your browser window,
commands that don't fit within your current screen size will be grouped into a three-dot menu. |
|
J. |
 |
|
Create Task
You can create a new task from My Tasks Page or any IFS Cloud Records page by following the steps below: |
Create a Task from a My Tasks Page |
|
Create a Task from a IFS Cloud Page |
|

- Go to My Administration > My Tasks Page.
- Click on Create Task button.
- This will take you to Create Task slide out menu.
|
|

|
Creating a Task from a Records Page |
Creating a Task from a Table |
- Navigate to any IFS Cloud Record page.
- Select a record from the Record Selector which you wish to create a task.
- Once you select a record, you will see a bell icon with a drop down menu.
|
- If you are on a record page that includes a table, select a record from the table which you wish to create a task.
- Once you select a record, you will see a bell icon with a drop down menu.
|
 |
Click the icon and select Create Task button from the drop down menu to access Create Task slide out menu.
|
|
|
|
Once you access the Create Task slide-out menu, fill out the information following the same instructions provided in the Edit Task section above.
|
View Task
You can view all the tasks assigned to you and all the tasks assigned by you,
via My Tasks page.


- All the tasks assigned to you are shown in My Tasks
section.
- All the tasks assigned by you are shown in Sent Tasks
section.
Subscribe to a Task
If you wish to subscribe to a task:
- Switch the view of My Tasks or Sent Tasks sections from Card View to
either Table View or List View.
- After switching the view, when you select a task from either the table
or the list, the subscribe option will appear in the Command Bar of the
table.
- Adhere to the guidelines outlined in the
Subscription section to subscribe to
the task accordingly.
